


In lieu of a Re-Watch post today, I present you with a guide for how to make your own non-copyright-infringing version of a tribble.
The Basics:
The tribble is essentially a furry softball. It is made using two figure-8-shaped pieces of cloth, sewn together perpendicularly. It is the simplest way to sew a ball—unlike the much more complicated hacky-sack method, it only requires two pieces of cloth.
This does not require a sewing machine or really much sewing skill at all. Anyone can try it!
You Will Need:
-
A flat section of cardboard
-
A jar, lid, or other small circular object
-
Needle and thread
-
Scissors
-
Polyester stuffing
-
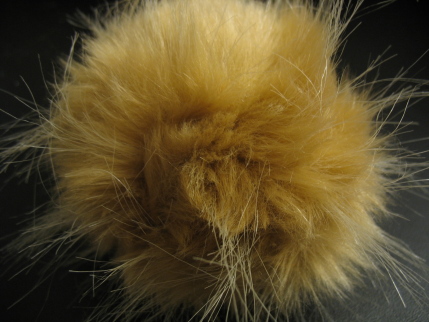
Tribble-like fur: I suggest long-haired faux fur, in camel, white, gray, or some combination thereof. Not all fabric stores carry this stuff (probably because it’s tacky) so call ahead!
Stage One: Creating the Pattern
The first thing you need to do is make a pattern. First, determine how big you want your tribble to be. I think smaller is cuter, so I chose to make it slightly bigger than a softball, or about 2 ½ inches in diameter. Remember, the long fur will make it look bigger than the pattern. I adapted from this baseball pattern.
You can click on any image to see a big version.
|
1. Choose a circle to trace. I used a contact solution bottle, but anything about 2″-5″ in diameter will work. Trace that circle on a thin but sturdy piece of cardboard. |
|
|
2. Trace a second circle so that the gap between the inner edges of the two circles is about ⅔ the diameter of the circle. In my case, with a 2 ½” diameter circle, the gap is about 1 ¾ inches wide. |
|
|
3. Draw lines from the top of one circle to the top of the other, and from the bottom of one circle to the bottom of the other (they should be parallel). |
|
|
4. Draw two lines parallel to the ones you just drew. The first line should be placed ¼ the total width from the top, while the second should be placed ¼ the total width from the bottom. |
|
|
The easiest way to do this is to draw a middle line from the center of one circle to the center of the other, and then split the difference between that middle line and the top line and bottom line. Now erase or ignore the top-top and bottom-bottom lines. Curve the edges of the middle corridor to create a figure-8 shape. |
|
|
5. Measure 1/4 inch around the entire figure-8 shape and draw that line. It’s your seam allowance. Now cut this piece out from the cardboard. |
|


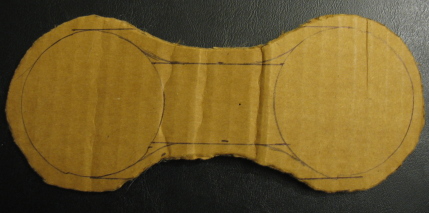
Ta-da! You have a pattern. I strongly recommend taking an old T-shirt, cutting out two pieces, and testing it out on that first. If it comes out oblong, you’ve made your circles too far apart, and if it doesn’t quite stitch up, your circles are too close.
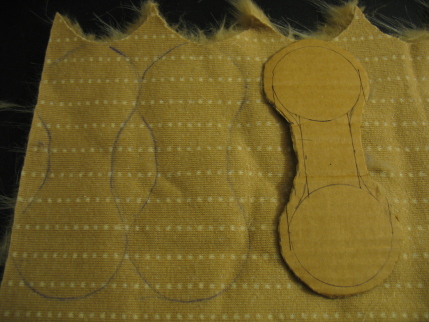
Stage Two: Cutting the Cloth
|
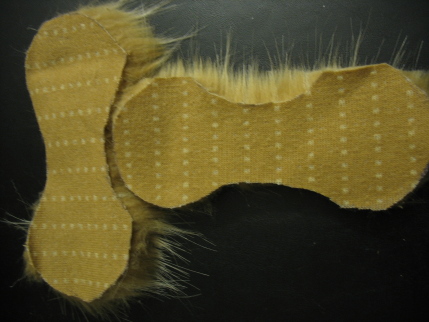
Trace your pattern onto the fabric, and remember you’ll need two pieces to make a tribble. Your faux fur is going to have a grain to it, so make sure that every piece you cut out is cut with the same grain. This means that when you sew the two pieces perpendicularly, the grains clash a bit and it gives the tribble its stylish hairdo. Top: Petting it with the grain. |
 |
|
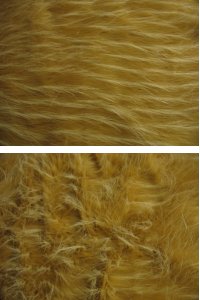
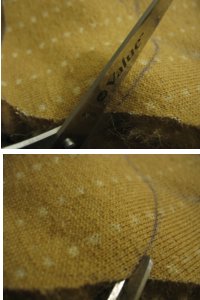
Cut along the line VERY CAREFULLY. You should snip using only the tip of your scissors at the base of the fabric. If you simply cut along the edge without snipping, you’ll take off the fur itself and leave the edges short and ragged with the center nice and long. Since the whole thing should be nice and long, cut very close to the base and try to avoid trimming the fur itself. |
|
|
Top: Do not do this! You’ll take too much fur off. |
|
Stage Three: Sewing it Together
|
Lay your two pieces of fur down perpendicular to one another. Try to line up the centers. Now hold the two pieces of cloth so that the fur is sticking outward, and not inward towards the inside of the tribble. |
 |
|
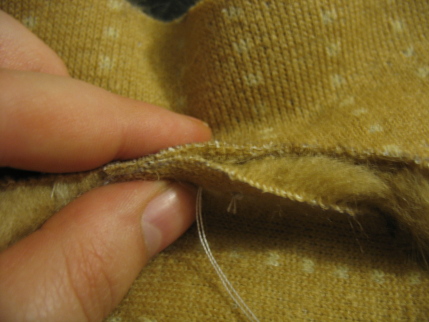
Start your knot and begin stitching about 1/4 inch from the edge of the cloth, and just work your way around. I did a simple running stitch. Work your way (slowly!) around the edge, leaving about an inch or so open so that you can turn your tribble inside out and stuff it. |
 |
|
When you get to that point, make a good strong knot—you don’t want the whole thing coming undone while you’re stuffing! |
|
Stage Four: Stuffing and Finishing your Tribble
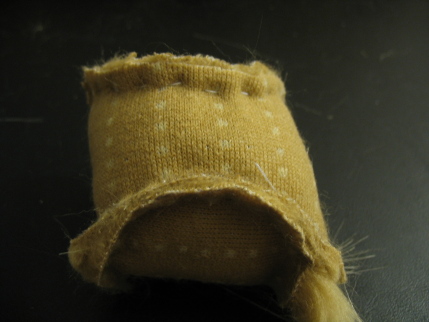
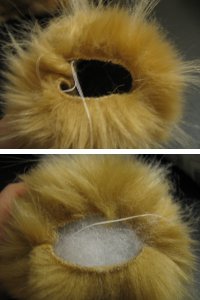 The fun part! Carefully turn your tribble inside-out (or right-side out, actually) by pushing it through the hole you left open. Once it is inside out, begin stuffing with the polyester fill. It should not take much, but stuff it as much as you like.
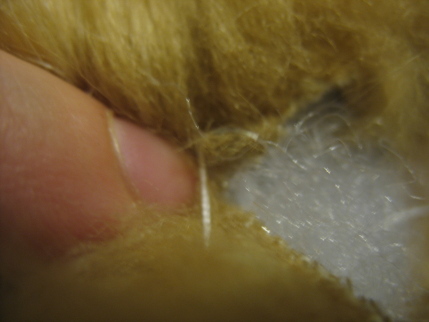
When you feel it’s been properly gorged with your quadrotriticale substitute, start a new thread and close the hole. This part is tough, but the good news is that the long fur is pretty much guaranteed to hide your stitch anyway. While you may have better luck than I did with the usual slip stitch method, I wound up just holding the two pieces together as best I could and sewing from underneath to try and hide the stitches. Your mileage may vary.
Stage Five: Hold it and Love it Forever
<3
Torie Atkinson has so many tribbles yet to make for the winners of those contests… she wishes this version could breed.
The Star Trek Re-Watch will resume next week with “Patterns of Force.”