


Greetings, fellow Stormlight fans and cosplay aficionados! After a bit of a hiatus we’re back with part two of the “Cosplaying the Stormlight Archive” series, this time featuring Szeth, Veil (Shallan’s alter-ego), Hoid, and—for the truly committed—full suits of Shardplate and Shardblades! Most of these costumes actually have canon artwork featured in the books, so we can get a little more technical about the particulars (and I won’t have to supply as many in-book sources). If you missed part one (Alethi uniforms and the Havah) you can reference it here.
Without further ado, let’s begin with everyone’s favorite assassin in white—Ezio Auditore! No wait. I mean… Szeth!
SZETH
Szeth son-son-Vallano gets a specific entry all to himself, as the clothes he wears aren’t typical of the Shin. The Parshendi require him to wear his white assassin’s outfit while he’s working for them, and Teravangian instructed him to continue wearing it once his oath-stone was passed on.
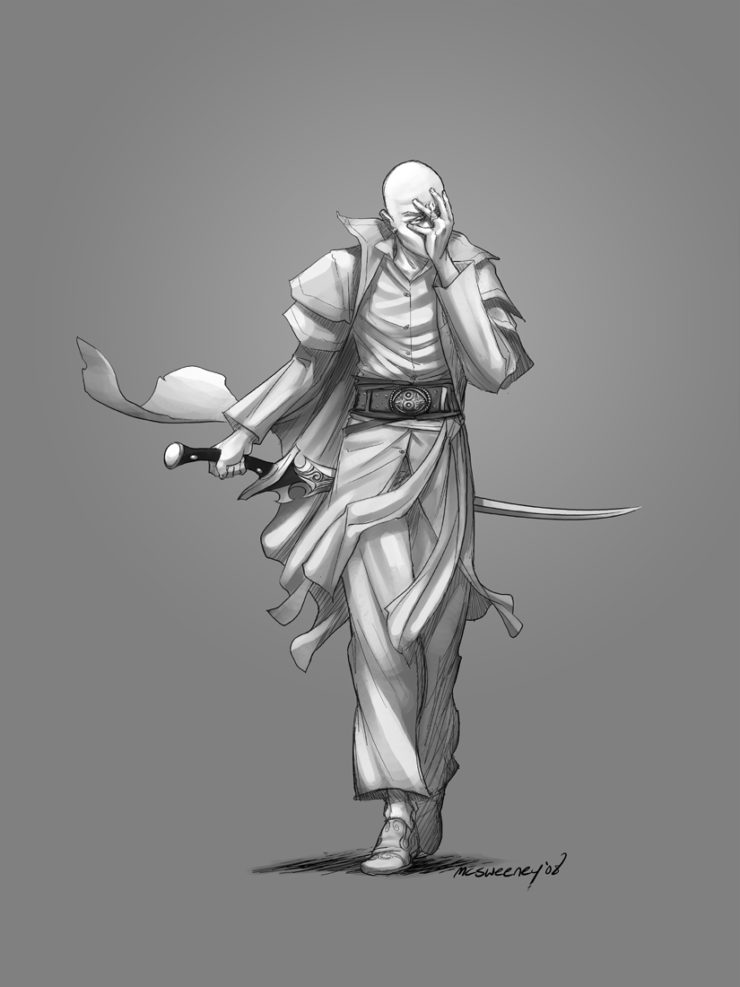
The figure had flowing white clothing: filmy trousers and an overshirt that rippled with each step. Words of Radiance (p. 373).
Thankfully we have this lovely canonical artwork by Ben McSweeney for Szeth, so we don’t have to rely so much on written descriptions! The biggest thing to remember, of course, is to use white fabric. His clothes appear to be cotton or linen—the fabric appears quite thin and has a nice flow, though you could use a lighter weight fabric to get that “filmy” effect.
The trousers are pretty generic, you could use any pajama pant pattern for them, or go a little more complicated with a 17th century slops pattern.
It looks as if he’s wearing a doublet (with or without sleeves, who knows) under a jacket which is worn open, and those little overlapping shoulder-capes—like the ones you’d find on a modern duster—are attached to the jacket.
So if we’re going with that theory, his doublet is fairly simple—the renaissance doublet I linked to in the previous article for the bridgemans’ outfits would work nicely here, just use the longer one… and maybe add a collar. This one (the blue jacket) could also work. If you’d rather go for a more historically “accurate” pattern (I use the term accurate loosely since let’s face it, this is another world and anything “accurate” here may not be in Roshar), try this Turkish Gentleman’s one from Reconstructing History. Szeth’s doublet looks as if it’s buttoned up the front like a modern men’s dress shirt—you could feasibly alter one for this purpose if you don’t want to make it all from scratch. Just buy some matching white fabric and extend the bottom.
As for his jacket/duster with shoulder capes, you can use any of the above patterns (the Turkish one would work best I think) and just add the capes—if you’re not confident in your skills to make those capes without a pattern, the black cloak of this Jedi pattern would work with some alterations. Same goes for this 18th century men’s cloak. Alternatively, you could go for a proper duster pattern like Butterick 3830 or Simplicity 4916 (if you can find it). If you’d rather try to alter an existing piece of clothing, try to find a white duster and remove some of the chest sections so it remains open in front.
His belt is beautiful, and I’d wager a guess that it’s made of leather. The buckle on the front will probably need to be crafted, as finding a buckle that large will be difficult (though not impossible). Making it out of craft/EVA foam is one option. For a more sturdy buckle, worbla would work nicely, though it’ll be more costly. See the section on Shardplate below for more information on working with EVA foam or worbla. If you really want to go all-out, make yourself a version out of clay and then mold/cast it in plastic or metal!
The rest of the belt doesn’t look too terribly complicated. A nice piece of belly leather and some dye will be all you’ll really need (though an edge beveler and edge slicker should really be used to round the edges, if you’ve got access to them or the disposable income to buy them). I’d use a stitching groover and maybe put in some stitching to create that nice channel along the edge, it just makes everything look more finished and nice!
If you’re not keen to drop a hundred bucks or so on leather and leatherworking tools (and who could blame you, really) you could create a very nice, simple version with pleather and maybe some craft interfacing if it’s not thick enough.
As for the shoes, they look like simple slip-on loafers.
Sadly I have no photos of cosplayers who have attempted Szeth’s costume. If you have one, feel free to drop a photo in the comments, I’d love to see!
WIT/HOID
Hoid gets his own section, as the King’s Wit uniform is unique in color if not design. This lovely fanart by Botanica Xu matches the written descriptions quite well.
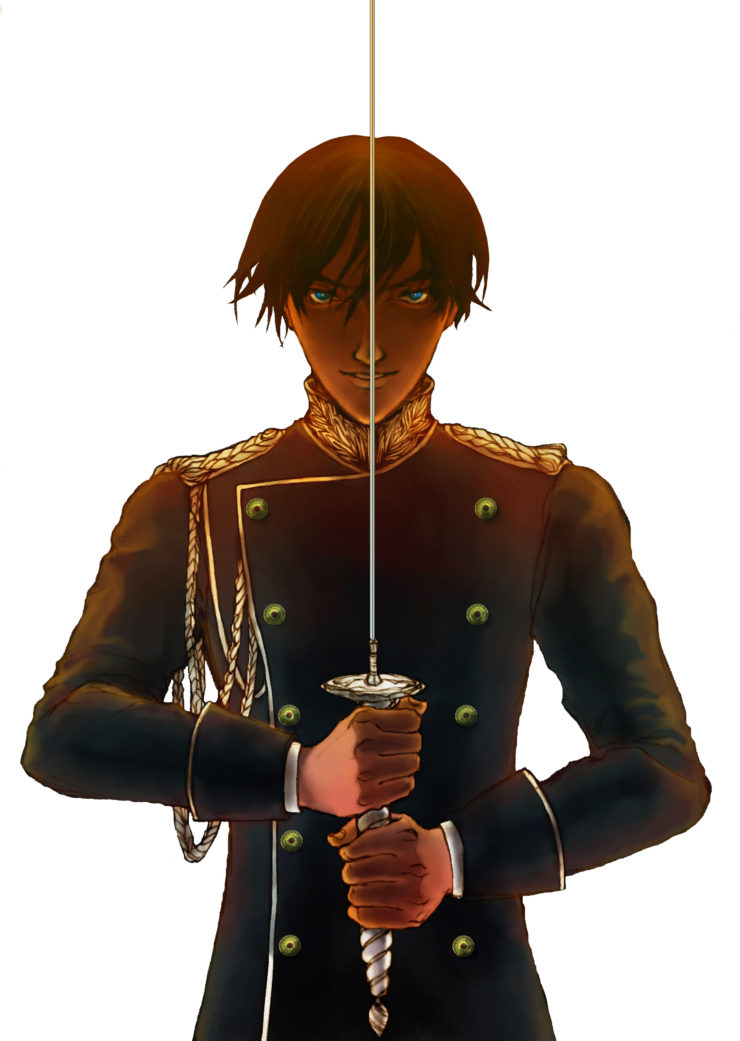
“He wore a stiff black coat and black trousers, a color matched by his deep onyx hair. Though he wore a long, thin sword tied to his waist, as far as Adolin knew, the man had never drawn it. A dueling foil rather than a military blade, it was mostly symbolic.” The Way of Kings (p. 197).
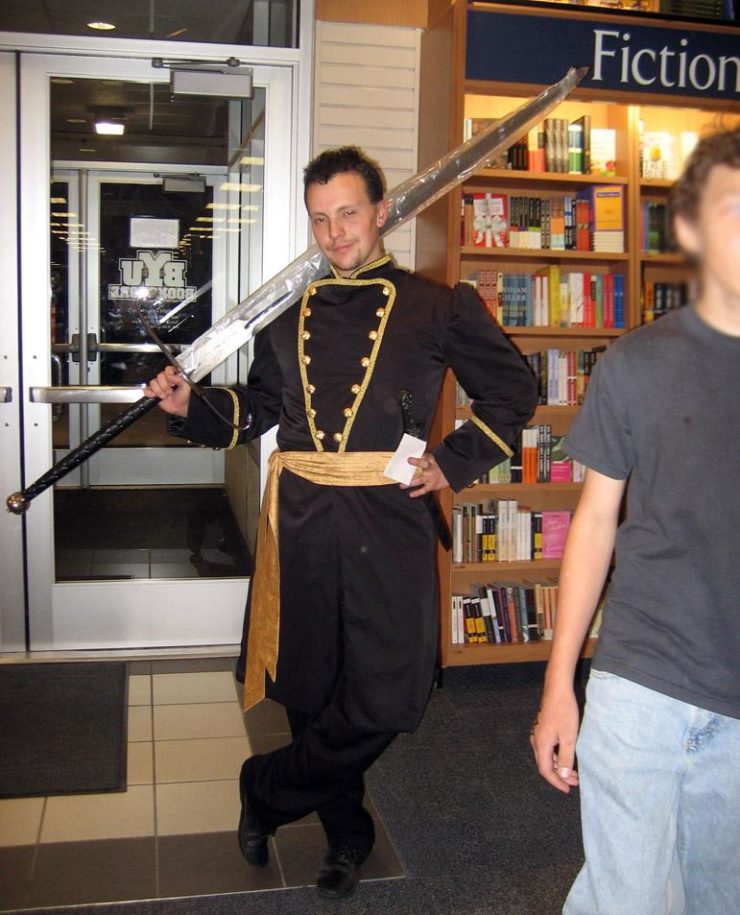
For Hoid’s Wit persona, I’d reference the Alethi uniform section of the previous article and make it in black instead of blue, with no glyphs. It’s a good bet that it’s a double-breasted jacket buttoned up both sides like the other Alethi uniforms. His hair color is a tricky thing—he’s got white hair in most of his other Cosmere appearances, but black here on Roshar. Another staple of any good Hoid cosplay is an ever-present smirk (As Josh is displaying above) and a hatful of witty insults to toss about.
TYN/VEIL
I’m combining Tyn and Veil here since Shallan steals her clothes, and models her Veil persona at least somewhat after Tyn. The outfit is described as a stiff white leather coat that goes down to the top of her boots, tied at the waist with a thick black hogshide belt so the jacket is mostly closed in front (Words of Radiance p. 280, 484). She’s also described as wearing “loose brown trousers, a white buttoned shirt, and a thin glove on her safehand.” (p. 484). Her hair is changed via lightweaving illusion to be dark instead of red (p. 482) and her safehand glove is tan (p. 273).
So from this, we can glean a few pieces of information (in addition to the lovely artwork above): Brown trousers and white leather coat, tan glove, brown hat with a narrow brim. In the illustration she’s also got calf-height boots and a scarf, and we can see that the jacket pins back in a style similar to that used in historical frock coats (to make riding horses easier).

Deana says of her Veil costume:
The coat is based on McCall’s M7374, though I had to modify the collar. The lining is made of the primary fabric for the two front panels, which is a duck cloth canvas made a little more water resistant with scotch guard. The button holes along the bottom hem make the pin-back possible.
Shirt is a simple wrap linen shirt with hidden snaps on the side, but frogs for the collar line closure. Based on the image, high boots were called for. The Ugs were the only ones I had—good for the cold Shattered Plains. For the hat, I used a straw western style one with the sides sewn into place. My husband made me the belt with a simple blank. It has a standard buckle, but I did not have him punch any holes so that it would “tie” better in a different manner.
Pattern is embroidered on the jacket using a stem stitch and couching technique with DMC embroidery floss and Pearl cotton. A five-strand braid rings the design, which is a simplified version of the illustration from Words of Radiance.
Much like Szeth’s overcoat, if you can find a white duster, it would work very well for this outfit. Add a couple buttons on the back and buttonholes on the bottom corners of the front and you’ve got your pin-backs. A dark leather belt worn outside of the coat, white dress shirt (or blouse), dark pants, a hat and a safehand glove would complete this ensemble quite nicely. This is one of the few costumes in the Stormlight Archive that could be achieved very easily via “found-item” costuming as opposed to making everything from scratch. Most of these items are easily attainable at any second-hand store—though you might have trouble hunting down a white duster/overcoat.
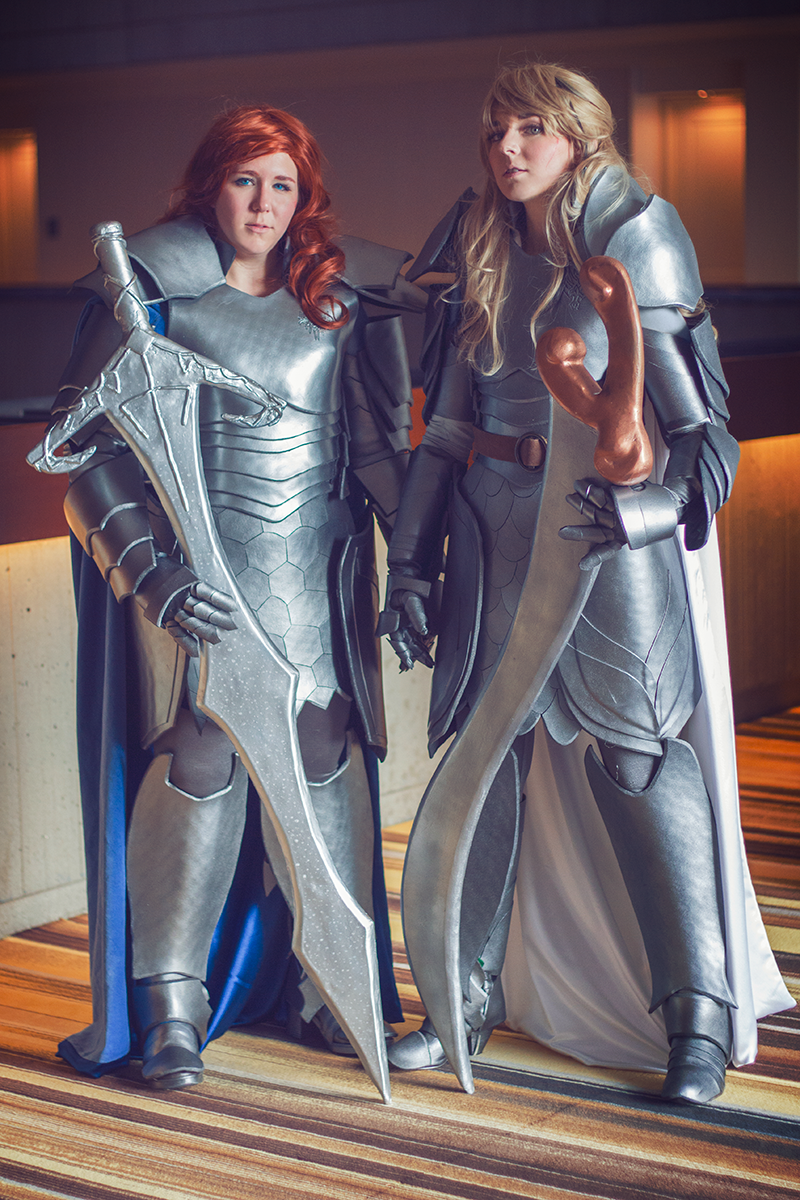
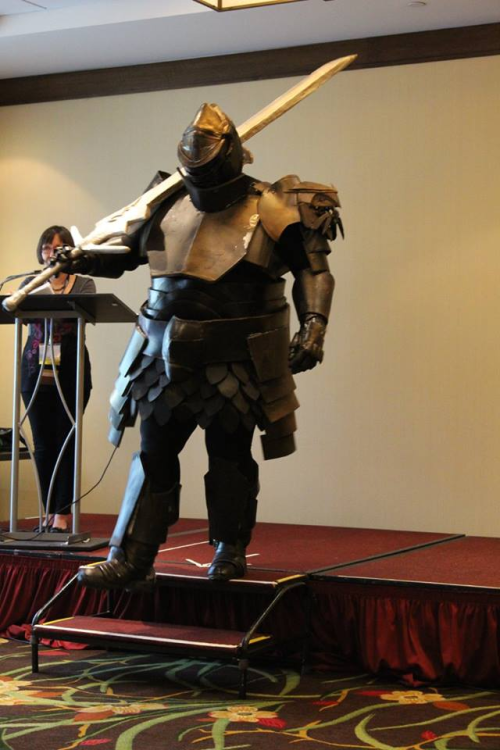
Shardplate
So you REALLY want a challenge, huh? There are several ways to approach this, ranging from relatively cheap and labor-light (cardboard or EVA foam methods), intermediate level (worbla builds), to extremely complicated and laborious (pepakura followed by fiberglass/bondo application, 3D printing, casting plastics, casting fiberglass). If you don’t already have experience in one of these advanced methods I’d say begin with the EVA foam ones. They’ll be the least hazardous to your health, friendliest to your wallet, and easiest to wear. But no matter what, this is going to be a lot more work and a bigger time commitment than most of the other cosplays listed above. “Beginner” is a bit of a misnomer here, because even the easiest of armor builds requires a higher level of skill and time than most other costumes (unless you’re really going all out and making giant poofy dresses with tons of layers and embroidery and such). Be aware of this going in.
Another thing to keep in mind is that there’s no way to be 100% accurate on this one. Shardplate is described as interlocking panels of armor with no gaps between, somewhat like Iron Man’s armor.
…he wore glistening blue armor made of smoothly interlocking plates. Unlike common plate armor, however, this armor had no leather or mail visible at the joints—just smaller plates, fitting together with intricate precision. The armor was beautiful, the blue inlaid with golden bands around the edges of each piece of plate, the helm ornamented with three waves of small, hornlike wings. The Way of Kings (p. 29).
“…there was no mesh of steel mail and no leather straps at the joints. Shardplate seams were made of smaller plates, interlocking, overlapping, incredibly intricate, leaving no vulnerable gaps. There was very little rubbing or chafing; each piece fit together perfectly…” The Way of Kings (p. 372).
Since most of us don’t have the budget of a Marvel film, this is nearly impossible to achieve—so do the best you can and “fill in” any gaps with fabric or small pieces of craft foam to achieve that carapace-like look. If you’re feeling really ambitious, you can incorporate light into your Shardplate as well, to make it glow like the Knights Radiant of old (or to show through the cracks of a “damaged” piece).
I can imagine what some of you are thinking right now…
“Jeez, Lyn, you just threw a lot of weird words and terms at me. Worbla? Bondo? Pepa-whatsits? What the heck is this stuff?” Fear not, dear cosplayer, I’ll explain all of that in the sections below… but first, a few notes on specific individuals’ suits of Shardplate.
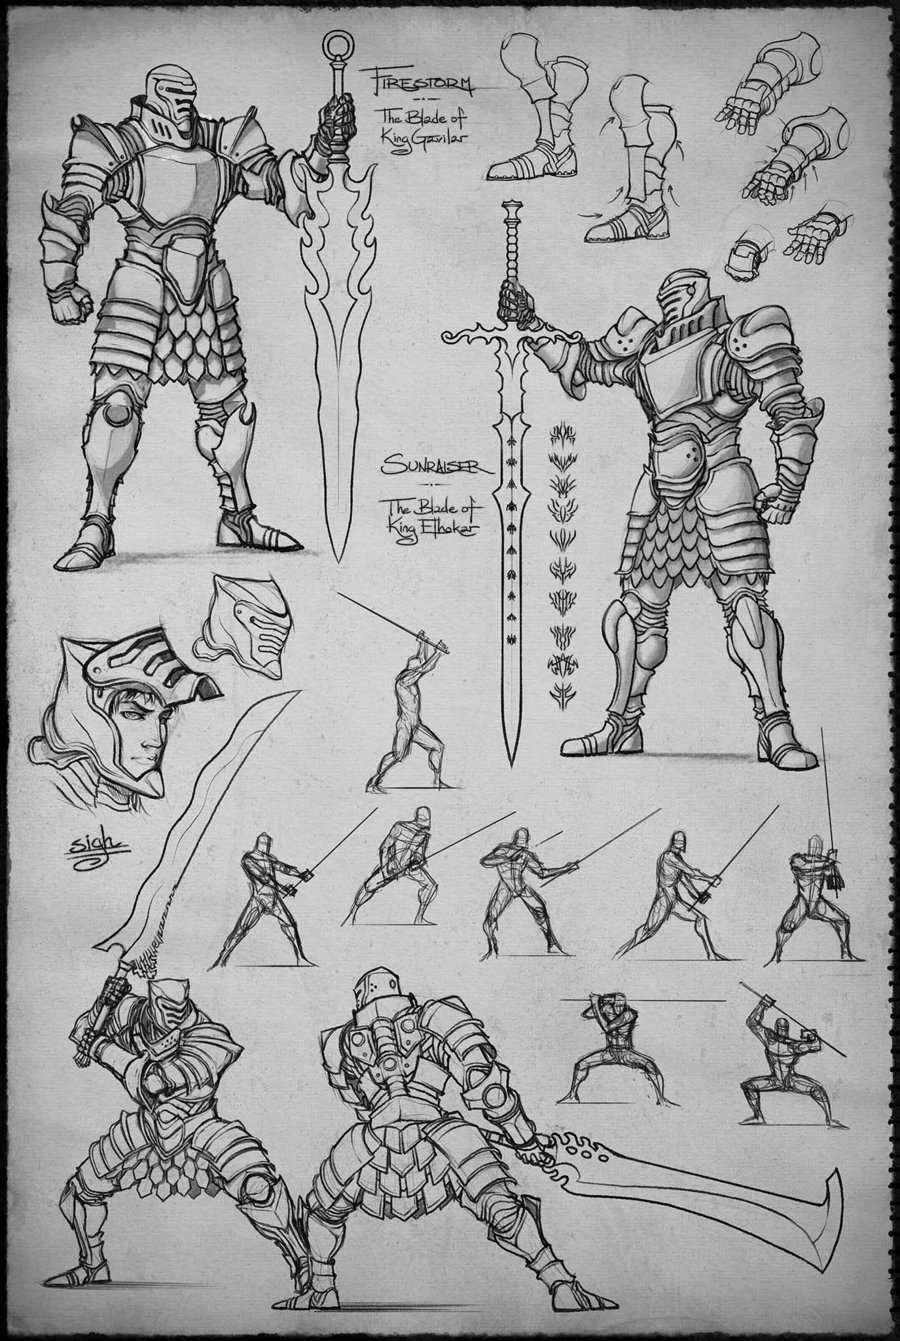
- Gavilar’s Shardplate is described above; blue inlaid with gold bands around the edges and a helm with three waves of hornlike wings.
- Sadeas’s Shardplate in Way of Kings is described as being ornate and burnished red, with an open helm The Way of Kings (p.104).
- Elhokar and Shallan’s brother Helaran’s are golden. When Amaram takes Helaran’s Plate from Kaladin, he appears to keep it gold Words of Radiance (p. 924).
- Adolin’s is “painted blue, a few ornamentations welded onto the helm and pauldrons to give an extra look of danger” The Way of Kings (p. 184).
- “Only one Shardbearer in the entirety of the ten armies used no paint or ornamentations on his Plate. Dalinar Kholin. Adolin’s father preferred to leave his armor its natural slate-grey color” and “the gorget of his armor was tall and thick, rising like a metal collar up to his chin.” The Way of Kings (p. 184, 408). When Renarin takes over his father’s Plate, he doesn’t paint it, so it should look the same Words of Radiance (p.240).
- Eshonai’s Plate is gleaming silver, her cape red The Way of Kings (p. 930). In Words of Radiance, Eshonai’s Plate is described as having “peaked joints, ridges rising like the points on a crab’s shell” (p. 329).
- Moash repaints his Shardplate “…blue with red accents at the points…” Words of Radiance (p. 807).
- As for minor characters, Erraniv, one of the brightlords Adolin duels, has Plate in “its natural color except across the breastplate, which he’d painted a deep black” Words of Radiance (p. 350). Relis, another of Adolin’s duel opponents, wears Plate “colored completely a deep black, breakaway cloak bearing his father’s glyphpair” Words of Radiance (p. 658). Abrobadar wears orange, and Jakamov green (p. 658, 659). Brightlord Resi’s plate is yellow in The Way of Kings (p. 822). Highlord Teleb has painted his Plate silver Words of Radiance (p. 950).
- The Knights Radiant in Dalinar’s visions had “Plate [that] glowed with an even blue [or amber or red] light, and glyphs—some familiar, others not—etched into the metal. They trailed vapor.” The Way of Kings (p. 303). In another of Dalinar’s visions, we see armor glowing red Words of Radiance (p.73).
It stands to note that almost every single reference I’ve found to modern Shardplate includes a cape as well.
BEGINNER
Let’s start with the “easy” ones. EVA foam is one of the most commonly used materials for large armor builds like Shardplate among the cosplay community currently, due to its accessibility, ease of use, and the fact that it’s the least toxic and expensive of the many materials. Have you ever seen those interlocking mats that you can place on the floor, that look a bit like puzzle pieces? That’s EVA foam. Craft foam is also EVA foam and can be used for smaller, thinner pieces. You’ll need to make mock-ups out of posterboard to figure out your pattern beforehand, then cut and piece your foam together. You can achieve some rounded curves by applying heat, though these curves can lose shape over time. As for attaching, score the surfaces you plan to adhere, apply high-temp hot glue, and BAM. Done. Contact Cement or Barge Cement are also common methods of adhering it, but be aware that the fumes of these are toxic. Also keep in mind how you’re going to fasten the pieces together and actually wear the thing (you may need a squire to help you into and out of your armor). Snaps, elastic, straps, velcro, and buckles are some different ways I’ve found to hold armor to my person in the past. Here’s a great tutorial video on how to attach long-lasting straps to your armor.
The Sisters Mischief made their fantastic suits of Shardplate with EVA foam.
“The trick for us was in deciding on a thickness that would allow us to both make our Plate hardy enough to withstand convention beatings and thin enough to accommodate those overlapping layers. Ultimately, because the price was right, we ended up going with big rolls of EVA that folks use for floor padding in garages, dojos, etc. In retrospect, I think we would have gone with something thinner around the joints; we had to sacrifice wearing our elbow and knee guards so we could walk, and the costumes didn’t look quite finished without them. TNT Cosplay Supplies and Wandy Foam are both wonderful suppliers of thinner foam in big rolls. And, bonus: their foam is smooth on both sides, which makes it a dream to glue and heat form.
“The two biggest tips I always revisit when I’m talking about EVA is to heat seal your foam before you get too far into your project. Whether you use an oven, a heat gun, or a blow drier, applying heat to your foam helps the cells shrink, so it’s less porous and more friendly towards primer and paint. Secondly…bevel your edges! Having a slight grade on the edges of your armor, particularly when using thicker than 3mm foam, is a great finisher.”
Think this is the right method for you? You’re in luck, for you’ve been visited by the Tutorial Spren.
- Kamui Cosplay has a fantastic writeup on her website here on working with EVA foam.
- Punished Props has some amazing tutorials on working with EVA foam, you can check them out here.
- Yaya Han also has a good video on working with EVA foam armor, specifically on pieces that have a more molded or 3D look.
- Amethyst Angel has an amazing set of tutorials on making thinner armor out of craft foam on her website here.
INTERMEDIATE
On to intermediate level. Worbla is a thermoplastic—a plastic that can be shaped and molded by applying heat. It’s become a staple of the cosplay community for armor and props, but if you’re planning on making an entire suit of armor out of it, be aware that it WILL cost you a pretty penny. I sunk about $800 into making Alphonse Elric from Fullmetal Alchemist years and years ago—that’s about how much you can expect to spend (if not more) if you decide to go this route.
“Lyn, you mentioned 3D printing above! Can I just print out my Shardplate?”
Well… you can try. Be aware that 1. You’ll need access to a printer and 2. You’ll need print files. If you’re good with computer modeling software and can make it yourself, you’re off to a good start—but most commercial 3D printers won’t be able to print something as large as a breastplate in one piece, and it will take a long time. (For example, I have a medium sized 3D printer and it took me four days of straight printing and two printer cartridges to make Star-Lord’s helmet from Guardians of the Galaxy.) Once you’ve printed it, unless you’ve got a super high-end printer, you’re going to have to do some work cleaning up all those little ridges and making it smooth. I really wouldn’t recommend this method for a full suit of armor—the other methods listed here will be easier and less time consuming.
- Once again, I’ll point to Kamui Cosplay with this video tutorial on working with worbla. You’ll need a heat gun, a lot of patience, and you’ll have to do a bit of work smoothing and painting the final product, but the results are well worth it. Your worbla armor will hold up far better than EVA foam, though watch out—you probably won’t be able to bend over or sit down anywhere! (Yes, I speak from experience on this one.)
ADVANCED
If you’ve got some experience and really want to go the full monty, pepakura builds and/or fiberglass are the way to go. The cost won’t be quite as high as with worbla, but the difficulty level shoots WAY up, and this stuff is SUPER TOXIC. I can’t emphasize this enough—if you work with fiberglass, do so in a VERY WELL VENTILATED AREA. You’re also going to be spending a LOT of time sanding, so invest in a good ventilator, a palm sander, and a dremel. The upside, however, is that this armor you could actually wear into battle. Fiberglass is used to repair cars and boats—you could probably deflect actual swords wearing this stuff. It will be heavy, but if you put the time into finishing it nicely it will be beautiful and tough as nails.
- Here’s a brief explanation of what pepakura is—you’d be using it as a base to lay your fiberglass over.
- Once you have a base (made of paper, cardboard, something rigid that ISN’T foam because the fiberglass will melt foam), you’ll begin with fiberglass and bondo application. Here’s a good tutorial on how to work with this method.
- On a personal note, I’ve found that I really love a product called Apoxie-Sculpt for finishing details. I’m not a big fan of sanding, and bondo sets so quickly that you don’t have a choice—you’ll have to sand to get a nice smooth finish. Apoxie-Sculpt, however, is a two-part putty that takes several hours to harden completely. Once it does, it’s rock solid—as hard as bondo. The longer working time allows for more flexibility, and since you can use water to rub and smooth —like you would using clay—you spend a LOT less time sanding. The downside is that it’s more expensive than bondo.
- I haven’t seen this method used in ages, but you can also cast fiberglass, which will result in less sanding but more prep work. The best tutorial on this I’ve found is this old one, but it’s a great writeup with lots of photos.
- If you’re a good sculptor or need to make several pieces that need to be identical, you can cast armor pieces out of plastic. Here’s a tutorial on how to accomplish that.
Phew! That was a lot of information. Still with me? Good, because I have one more thing to talk about…
Shardblades
Sadly we can’t make them magically appear after ten heartbeats (if only, right?), but I do have some recommendations on how to go about making a GIANT HONKING SWORD that WON’T be impossible to lift and carry. (If you make one out of wood you’d better have been training as a bridgeman because you’re gonna need GUNS to carry that baby around all day, and most conventions probably won’t allow it.)
Thankfully, we here on Earth have access to a wonderful little thing called insulation foam, aka polystyrene. It looks like this:
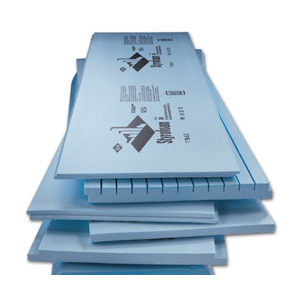
not this:
The Sisters Mischief used insulation foam and worbla to create their gorgeous Shardblades.
“The Shardblades are 5 ft. each—almost as tall as we are!—and made out of a PVC core and pink insulation foam that was then covered in worbla. Unfortunately, one of our favorite parts doesn’t show well in pictures…the blades are covered with tiny beads of condensation.”
Insulation foam is lightweight, cheap, and very easy to work with! It comes in either pink or blue, and can be found at your local big-box hardware store (like Home Depot or Lowes). It can be cut with a hacksaw blade, drywall saw, or even an electric turkey cutter, and it’s very easy to sand (I usually use a file to sand away the big parts first, then start hitting it with gradually higher density sandpapers.) You’ll wind up with a nice, smooth finish and a weapon that won’t break your arms—or your bank account. You can use a dremel to cut in designs or glyphs, and use fabric puff-paint to draw on raised designs (try craft foam for bigger designs or raised flat sections). A few warnings, however:
- Insulation foam will break very easily. Lean it against something and hit it the wrong way, and it’ll snap. So be gentle, and no dueling!
- Do not under any circumstances try to spray-paint it without sealing it first. Spray paint will melt the foam, as will some glues. Always try out any material you plan to put on the foam on a test piece first.
- Wear a facemask and eye protection when sanding it, and do it someplace where you don’t care about a metric ton of pink or blue dust getting all over everything.
Lots of people choose to finish their foam weapons with a variety of methods to make them more durable, like worbla (remember worbla?), plaster of paris, gesso, latex caulking, and (after it’s been sealed) plasti-dip.
For a bit of added stability for long props (like these), try using two thin pieces of foam and sandwiching a piece of PVC pipe between them.
Notes on specific Shardblades:
- Oathbringer (Dalinar > Sadeas > ???): “Six feet long from tip to hilt … It was long and slightly curved, a handspan wide, with wavelike serrations near the hilt. It curved at the tip like a fisherman’s hook, and was wet with cold dew.” The Way of Kings (p. 202-203). “…curved, like a back arching, with a hooklike tip on the end matched by a sequence of jutting serrations by the crossguard.” Words of Radiance (p. 88).
- Sunraiser (Elhokar): “It was long and thin with a large crossguard, and was etched up the sides with the ten fundamental glyphs.” The Way of Kings (p. 203)
- Eshonai: “[It] was wicked and barbed, like flames frozen into metal.” The Way of Kings (p. 930)
- Szeth (Note: This is an Honorblade, not a true Shardblade): “His Shardblade was long and thin, edged on both sides, smaller than most others.” The Way of Kings (p. 25)
- Firestorm (Gavilar > Elhokar): “[It was] six feet long with a design along the blade like burning flames, a weapon of silvery metal that gleamed and almost seemed to glow.” The Way of Kings (p. 29)
- Helaran Davar (Shallan’s brother) > Amaram: “It was engraved and stylized, shaped like flames in motion.” The Way of Kings (p. 671) It is also described as having a white gemstone in the pommel—or at least, the stone flashes white. (p.706) It is also described as being “etched along its length” Words of Radiance (p. 160).
- Adolin: “Its surface was austerely smooth, long, sinuous like an eel, with ridges at the back like growing crystals. Shaped like a larger version of a standard longsword, it bore some resemblance to the enormous, two-handed broadswords he’d seen Horneaters wield.” Words of Radiance (pp. 219-220).
- Moash: “…a shimmering silvery Blade. Edged on both sides, a pattern of twisting vines ran up its center.” It has a heliodor in the pommel. Words of Radiance (p. 780, 782).
Well, that’s all for now! I should be starting work on my own Shardblade soon (in hopes of having it completed by the November release party), so if you want to follow along on my progress and learn step-by-step how to make one, keep an eye on my Facebook page. Many thanks to Lady Cels for her fact-checking and links to additional tutorials for EVA foam construction, and of course to all the fantastic cosplayers who gave their permission for their photos to be used.
Lyndsey wants to make her own suit of Shardplate so badly, but she recognizes that she doesn’t have time to make all the cosplays on her wish list. If you haven’t had enough of her blathering already, follow her writing or cosplay work on her website or follow her on facebook or twitter.